
Week 1
We began week one by learning the basics of animating in Maya. Including how to use the timeline, set keyframes and the graph editor.
We also took a look at some reference videos of ball bounces; this gives you something to base your animation off.  For my first animation I wanted to give the ball “character”, so I made him excitedly accelerate towards the ground, I wanted it to appear like HE was in control of himself instead of gravity being in control of him. To further show this I “kill” the ball, and it slowly rolls away under the effects of ordinary physics. I also enabled the motion trail, to better visualise the movement of the ball through the animation.
Arnold render
Using REFERENCE footage
Using reference footage is incredibly important in animation, in order to plan out what you want to get from your characters expressions. Below is the reference footage animator Emma Shih used on Into the Spider-Verse.
Reference and shot comparison from Emma (Pei-Hsuan) Shih on Vimeo.
Week 2
Ball rig
 Using a rig allows you to more easily control each part of the character/object individually, there are separate handlers for positions, rotation on each axis, and squash and stretch. This helps when doing more complex animations involving a lot of rotation.
Obstacle course
ASSIGNMENT 1 SUBMISSION
Week 3 – Flour Sack and Arm rig In Week 3 we had a further look at rigs, this time on a flour sack. It was fun to try and use the rig to give a usually inanimate object character.
Hand Rig
We then had a go at creating a basic “Forward Kinematic” rig by creating a basic arm and hand using primitive cubes then parenting them all together so that any motion is applied forward through the rig.


Week 4 – IK Rigs
forward kinimatics vs inverse kinimatics
A forward kinematic rig is a rig where the rotation is applied “forward” through the rig, for example with our arm, if you rotate the upper arm, the forearm, hand and fingers (forwards in the rig) follow. An inverse kinematic rig, is the opposite. In this case you would animate from the hand, and Maya then calculates the positions of the forearm and upper arm for you.
Rigging a pair of legs using inverse kinematics

Week 5
Dynamic Poses


Head turn

Week 6
walk cycle
 Richard Williams’ book on animation is incredibly helpful reference for any basic animation.
  Above is my first attempt at a walk cycle in Maya.
Animation Layers
Your animation can be broken down into layers, this allows you to separate movements, that can then be applied on top of each other. For example, here I have separated the eyes onto a different layer, they can now be animated independent to the rest of the body.

Week 7 – Walk Cycle Refinements and Weight Lift
In Week 7 I did some further refinements on my walk cycle based on the slides we were given. This included changing the angle of the feet and legs to give them a more natural pose, increasing the stride length, and adding a roll motion to the foot.
I then extended the walk animation out by duplicating it 3 times using the Time Editor and then “matching” the clips so the character would carry on moving forward, instead of returning to its origin each repetition.
Box lift
In order to get our character to lift something, we need to use a parenting constraint. This is done by adding 4 Locators to the scene, one that is parented to the left wrist, one for the right, another for the box, and then a final one to parent them all together. Now, when moving the 4th locator (the whole group) both the box and wrists will move in unison.

We then took a look at doing something similar with parenting constraints, this allows you to connect and disconnect objects on a keyframe, so you can animate more complex interactions, like a character throwing a ball.
-

- Instead of parenting in the usual way, we go into the Constrain menu, under the Animating toolset.
-

- This then adds a node to the channel box that allows us to key when an object is constrained.
The result:
Week 8 – Rotoscoping
Rotoscope animation is the act of tracing over reference footage to create accurate animations. It was used by Disney a lot in the 20th century to create their animations.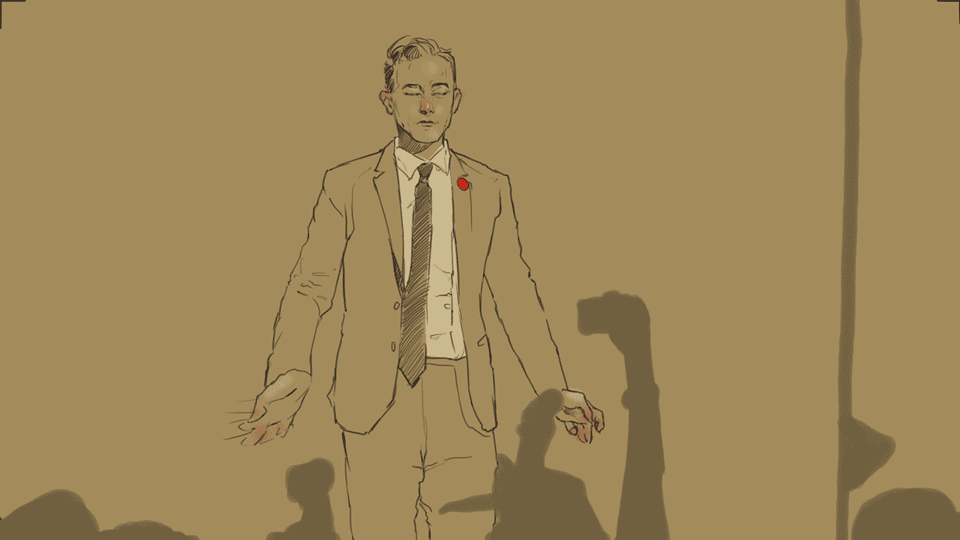
Below is my first attempt at a rotoscope animation.
ASSIGNMENT 2 SUBMISSION

Week 9 – Camera’s and Animatics
In week 9 we looked at how the camera can influence our animations. More specifically we looked at the effect that Focal Length and Depth of Field had on how our characters appear on screen.
Focal length
-

- 20mm
-

- 35mm
-

- 100mm
Depth of field
-

- 2.0f
-

- 14.0f

We also learned how to import audio into our scene. You can do this by right clicking on the speaker in the bottom right of the screen, then clicking “Import Audio”. The waveforms of the audio clip then appear in your timeline, allowing you to easily animate along to it.

Assignment 3
For my third assignment of animating to an 11 second audio clip I wanted to practice lip-syncing to speech.
To help with making this the first thing I did was look for reference, and I found this great TikTok video that acted out this clip, in the style of a Pixar character, which was absolutely perfect for my animation.
I imported this clip into Maya as an image sequence, so I could animate along to it.

Below are some video clips from various points in the animation process. I began by blocking out the main facial animation on one layer, then the body animation on a separate layer. Then after blocking I went back over the animation to add more detail.
Development 1
Development 2
Development 3
DeveLOPMENT 4
After completing the animation on my main character, I set out a camera sequence that would switch between the main character, and the interviewer. I went for a higher than default focal length for my camera (50mm), as I wanted to capture the vibe of TV news. I also found a nice scene of the oval office on Sketchfab, which I placed my characters inside.
I then completed the animation of the interviewer, which was much simpler as I wanted him to be a very stoic character in comparison to the main one. I then rendered out the sequence in Arnold.
Final Submission
Overall, I’m extremely pleased with my animation, I think the lip-sync worked very well and I managed to give my 2 characters very different personalities via the use of animation. One thing I would’ve liked to include was more movement so I could show off weight transfer, but I think that would’ve been hard to match with the “TV Interview” vibe I was aiming for.