
- Managing your Blackboard folders and items
- Creating and uploading content
- Copying and moving content
- How to download bulk content from a module on Blackboard
- Deleting content
- Checking your course or module content
Contents
- 1 Managing your Blackboard folders and items
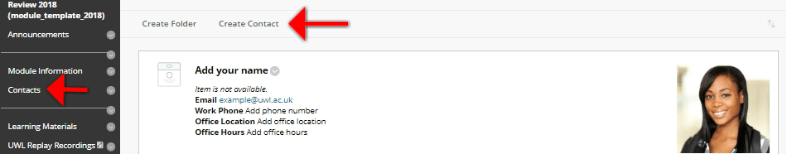
- 2 How to add/edit a contact in Blackboard
- 3 Creating and uploading content
- 4 Copying and moving content
- 5 Copying or moving content to a different Blackboard course
- 6 Copying or moving content within the same Blackboard course
- 7 Copying or moving a folder
- 8 Copying multiple items at once
- 9 How to download bulk content from a module on Blackboard
- 10 Deleting Content
- 11 Deleting content items and folders
- 12 Checking your course and module content
Managing your Blackboard folders and items
There will be many place holders on the Blackboard template that you can edit, you may also want to edit your own existing content.
Editing existing content/folders
Go to the content area where the content currently exists, hover over the title until the grey downward arrow appears and click.
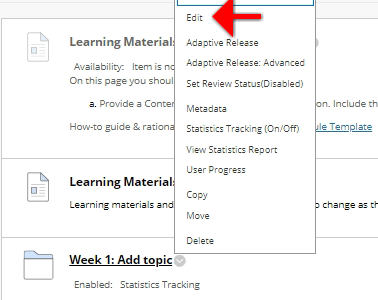
- Change the title
- Add/edit a description
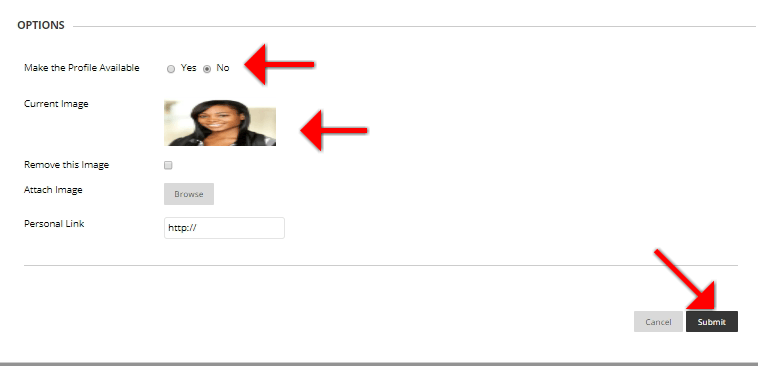
- Make the item/folder available to students.
- When you have finished updating click submit.


2 Content area = Hidden from students
Creating and uploading content
Editing and Managing Blackboard course Content
The Blackboard help site has the following pages on creating, uploading and organising content on your Blackboard courses:
Create Course or Module Areas for Content – Adding content areas to your course or module menu, creating folders, building Blackboard ‘Learning Modules’
Create Content in a Course or Module Area – A description of the content types which you can create or upload in Blackboard – includes web links, audio and video content
Edit and Manage Course or Module Areas and Content – Editing previously-created content, reordering content, setting date restrictions, moving and copying content
Using the Content Collection file repository – How to store, share and publish content in personal, course and institution folders in the Content Collection area.
Creating a content item
When creating or uploading content in your Blackboard course, the Item is the basic building block.
An Item must have a Name. It can also have one or attached files, and/or an area of descriptive text (which can include embedded images, audio and video content). A typical Item will display to students like this:

To create an Item go into any content area (e.g. Module Information, Learning Materials). Click on the Build Content button and select Create > Item.

The screen which opens is one which you will see whenever you come to create content or edit text in Blackboard.

Note that you can expand the editing menu from one to three rows to gain additional options.
Attach a file
Scroll down, and you can attach one or more files.
Normally you will click on Browse My Computer to upload a file from your PC, a USB key, or a network drive.
This is the simplest way to upload content, although you may find it beneficial to make use of the Blackboard Content Collection.


You may also wish to Track Number of Views – so that in due course you can see who has viewed each Item, and when.
When done, press Submit.
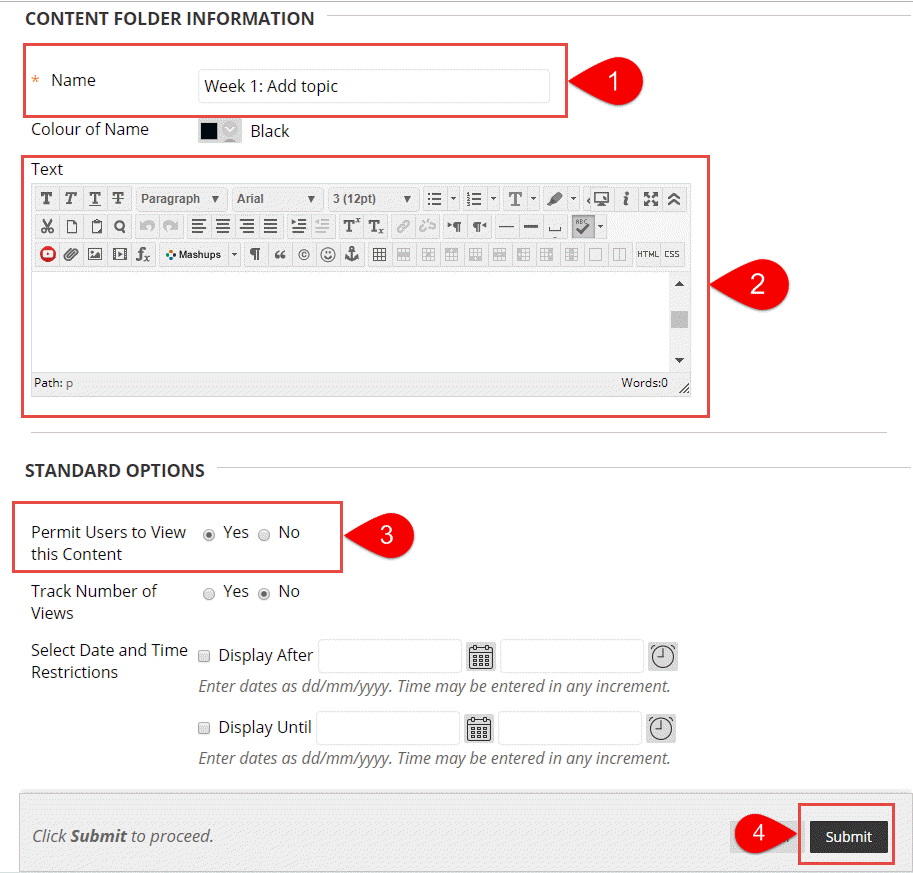
You can create Folders within a Blackboard course menu to make your content easier to navigate.
A Folder must have a Name. It can also have area of descriptive text. We recommend that you add further information (e.g. topics or a summary) in the Description field. It gives students further context and also helps locate items when searching.
To create a Folder go into any content area (e.g. Module Information, Learning Materials). Click on the Build Content button and select New Page > Content Folder.


You can also insert a link within the text field of a content Item.


When you first edit a content item, the editing toolbar will display as just a single row.
This allows you to
- format text as Bold, Italic, Underlined
- change the font face, size and colour
- insert bullets or a numbered list
- spell check your text
- insert or remove a hyperlink


The additional options on the bottom row include
- inserting a link to a file within the body of the text (rather than in the list of attached files)
- inserting an image into the body of the text
- inserting an audio or video media file
- via the Mashups button, embedding a YouTube video or Flickr image
- insert a table
Those of you who understand HTML can click on the HTML icon to view and edit the source code.
You can get a quick preview of the item by clicking here


Copying and moving content
Folders and Items in Blackboard courses can be copied or moved
- to other locations within the same course or module
e.g. an item can be moved from Course Documents to Learning Materials
- to other courses or modules on which you are enrolled as an Instructor
Copying or moving content to a different Blackboard course

From the menu which appears, select
- Copy – to make a copy of the Item
- Move – to move the Item
Open the drop-down list labelled Destination Course.
This shows a list of all the courses and modules for which you are an Instructor.


Copying or moving content within the same Blackboard course
Hover over the Item and click on the down-arrow which appears to the right of the Item name.
From the menu which appears, select
- Copy – to make a copy of the Item within the same course
- Move – to move the Item elsewhere in the same course
On the next screen, leave the Destination Course as it is.

Copying or moving a folder
Copying multiple items at once
You can use the the Course Copy feature to copy a selection of items from one course to another. This is an advanced function and should be used with care. Contact us if you need advice.
You must not copy everything. You must exclude the Assessments section, the Announcements and the Discussion forums.
If you need any advice on copying your course content then please contact: expert-academy@uwl.ac.uk
See Course Copy on the official Blackboard Help website for step by step instructions.
How to download bulk content from a module on Blackboard
Multiple documents from a module can be downloaded simultaneously through the content collection on Blackboard. The video below explains how this can be done.
Deleting Content
If you delete a content area from your course or module menu you delete all Folders and Items within that area – although any linked files will remain in the Blackboard Content Collection.
Deleting the menu item
Hover over the menu area you want to delete and click on the small editing arrow which appears; then click Delete.
If you are not totally sure that you want to delete the area, select Hide Link which will make it invisible to students.

A warning message appears; click Delete.

Another warning appears – listing content items or foldesr which will be deleted. If you are sure you want to proceed, click Delete.

Deleting content files
Because every file you upload to a course is stored in the Blackboard Content Collection, the act of deleting a menu area does not actually delete uploaded files. To delete these, go to the course Content Collection via the Control Panel.

Here you will see all files uploaded to the course, and you can select any you wish to put in the course Recycle Bin.

Deleting content items and folders
You can delete a Folder or an Item in exactly the same way. If you delete a Folder, you automatically delete all Items within it – although any linked files will remain in the Blackboard Content Collection.
Deleting the folder or item
Hover over the title of the Folder or Item you wish to remove, and click on the small editing arrow which appears; then click Delete.

Deleting content files
Because every file you upload to a course is stored in the Blackboard Content Collection, the act of deleting a menu area does not actually delete uploaded files. To delete these, go to the Blackboard course –> Content Collection via the Control Panel.
Here you will see all files uploaded to the course, and you can select any you wish to put in the course Recycle Bin.
Checking your course and module content
Student Preview
With student preview, you can experience your course exactly as your students do. While in student preview mode
- you will see only the content which has been made available to students
and you can carry out the following student activities
- submit blackboard assignments
- take tests
- create blog and discussion posts
- create journal and wiki entries
- view student tools, such as My Grades
To enter student preview click on this icon at the top of the screen

While in student preview mode an orange banner will be displayed at the top of the screen

When you enter preview mode a temporary student account is created. When you exit preview you will be asked if you want to delete this temporary user. Normally you will accept this default. However you should choose Keep the preview user and all data if you submitted work as a student, and now want to grade it via the Grade Centre.